Gmail is hands down one of the most popular and used social networks, especially in the professional field, but how much do we know of its hidden features? It is the go-to application for all companies big and small. Gmail has changed the way companies communicate with their employees or potential employees. With such diverse and ever-growing features, it has become quite sufficiently user-friendly. But there is still much that is to be learned on this platform, such as creating your own Gmail signature.
Gmail signatures appear at the end of the emails you send out. It acts as a visiting card in the digital world. Gmail signatures make your emails appear elite and quite sophisticated.
To create one is not much hassle if you know how to go about it in the right way. And that is exactly what we will be doing today, creating our own Gmail signature.
First, let’s see why we need to create a Gmail signature;

This article consists of:
- Why create a Gmail signature?
- How to add signature in Gmail?
- How to include a photo in your signature?
WHY CREATE A GMAIL SIGNATURE?
- It creates awareness of the person sending the mail: Apart from the very obvious usernames, signatures vividly state who is sending you the email.
- It is sophisticated: An email with a signature carries a sense of sophistication and authority. It generally receives important because it looks legitimate. People with a priority most probably have their own signatures.
- Acts a visiting card: You Gmail signature is where you can add significant details about yourself such as your name, designation and the brand/company you own or work for.
- Gives authenticity to your emails: Gmail signature hold the role of authenticity. Any email you recieve carrying their signature significantly stands out form the rest. Hence, having a signature can only be an advantage.
But the real question is how to create and apply them to your emails, lets dive in!
HOW TO ADD A SIGNATURE IN GMAIL?
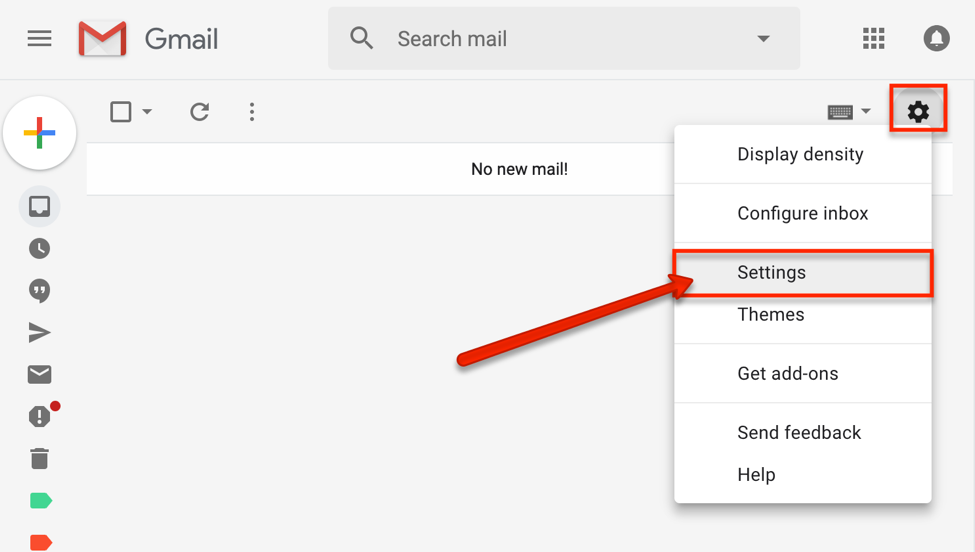
Step 1: Log in to your Gmail account. And click on the settings icon at the top-left corner of your laptop.
Step 2: Select the “See all settings” option

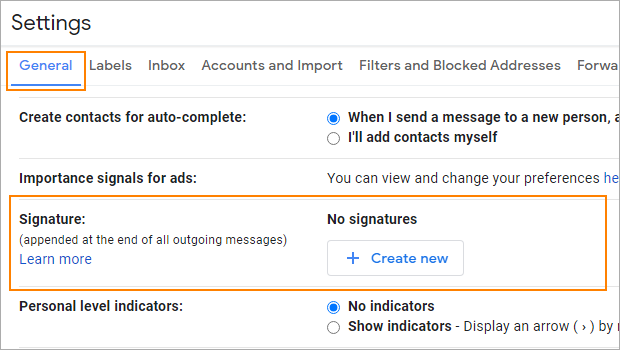
Step 3: Scroll down right to the bottom under the “GENERAL” tab and your last fourth option will be “Signature”

Step 4: Click on “Create new” and name your signature
Step 5: After this step, you’ll have to type in what name you want to be displayed as your signature (this will most probably be your name)
Step 6: You can now personalize your signature’s font style, size, placement, and color. You can also include your picture and website links as a part of your signature
HOW TO INCLUDE A PHOTO IN YOUR SIGNATURE?
As mentioned earlier, your signature can also include your picture and links to your brand/company’s website or even your socials.
Step 1: Click on the image icon provided in the toolbar under the signature text box
Step 2: You can either add the image from your drive or upload it from your device
Step 3: once the image is uploaded, go ahead and size it according to your preference
Step 4: You also need to select where the image goes, above your name or below it
After you complete this process, make sure to change your setting below the signature option from “No Signature” to the one you created, else your newly created signature will not get applied automatically
You can also create multiple signatures under the same account and choose from among them.
Gmail offers a wide range of possibilities to transform your account into a neat and professional one. A Gmail signature automatically boosts up your account to appear polished and mastered.


